Valentines Day Cupcakes!

13 Feb

So, I was off work all weekend and decided that it would  be a “me” weekend….which included me reading, watching movies, and of course…baking! I knew all the restaurants around town would be slammed, and I also knew that almost all of my fellow co-workers would be working doubles. What doesn’t relieve stress like cupcakes? Plus, I found a new recipe I wanted to use.

Once again, I made my icing first. I don’t have a name for it. I’ve just been calling it “Weird Icing.” You’ll see why once you see the ingredients. I found this recipe from The Pioneer Woman.

5 tbsp flour
1 c milk
1 tsp vanilla
1 c sugar
1 c butter

First, mix the flour and milk in a saucepan over medium heat. (Weird, right? It’s an icing with flour? And on the stove?) It’ll get thick, but it’ll take a few minutes. Mine didn’t get thick in the time frame I thought it should, and I go worried and took it off the stove and it thickened up almost immediately. Then I added the vanilla. Alright, let this sit and in a separate bowl mix the sugar and butter. I left both of these sit while I made my cupcake batter, because the flour/milk mixture has to be cool before you can mix it with the sugar/butter mixture.


Mmm, warm flour and milk. Yum!

So, while that is cooling I made my cupcake batter. I got this recipe from Joy the Baker. I’m going to put the original recipe, but I tweaked it a bit. Also, as a heads up…this recipe uses about a million bowls. So, be ready to do extra dishes.


1 c unsalted butter, soft
1 3/4 c sugar
4 large eggs
1 c milk
1 tbsp vanilla extract
1/2 vanilla bean, seeds scraped out
2 3/4 c flour
1 1/2 tsp baking powder
1/2 tsp salt

I didn’t use a vanilla bean in my batter, because…well…I couldn’t find one. I’m going to look into that though. But everything else is good. So, first in one big bowl add the flour, baking powder, and salt and whisk together. In a separate small bowl mix the milk, vanilla, and if you have one the vanilla bean seeds. In a third bowl, mix the butter and sugar until it is fluffy. After your sugar and butter are fairly fluffy add your eggs one at a time, mixing in between each egg. One you have all of this together, Joy the Baker says:

“with the mixer on low speed, alternately add the flour mixture and the vanilla milk mixture in three batches, starting and ending with the flour.  When the batter is almost combined, stop the mixer and finish mixing the batter with a spatula, making sure that any flour bits at the bottom of the bowl are well incorporated.”


My different sections of batter
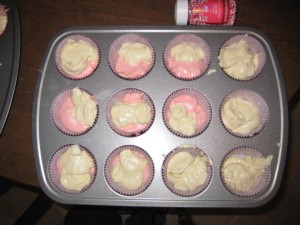

My cupcakes in their liners. As you can see, the one on the top has a few with no pink…I made some cupcakes without strawberry extract incase someone at work was allergic to strawberries. I was thinking ahead!

At this point, I deviated a little more. Once everything was mixed together to my satisfaction, I separated the batter in half in two different bowls. I left one half of the batter as it was. The other half I added red food coloring and about a tablespoon of strawberry extract. I wanted to make multi-color cupcakes for my lovely co-workers. One I had that done, I put one spoonful of each batter into the lined cupcake tin. I put them in the oven on 350 degrees for 24 minutes…which is what JtB’s website said. I would do it a couple minutes less, the next time.


The finished cupcakes!

While my cupcakes were in the oven, I mixed my two icing mixes together and added some red food coloring to that, as well. It’ll be a very fluffy icing. I couldn’t help myself at this point: I had to try this weird icing. It was delicious! Perfectly sweet and smooth!


Delicious!


After this, I took  my cupcakes out of the tin to cool so they would cool faster. While they were cooling I jumped in the shower so I wouldn’t be impatient (because last time I was and my cake fell apart!). I iced my cupcakes and poured red, white, and pink sprinkles in a little bowl and dipped the top of the cupcakes down into the sprinkles. Less mess, let me tell you! Then, the liners I had bought came with little hearts on toothpicks to stick in the cupcakes…I used them to make the plain cupcakes from the strawberry mixed ones! And, voila!


I made some without sprinkles and some without icing, just so there would be a little variety for everyone. I took them into work, and they were gone in about 30 seconds! I tried one myself, and the strawberry part was so good I wish that I had done the whole cupcake in strawberry. But, I’ll know better next time! Also, it would have been convenient if I owned a cupcake holder…but I’m just a new baker so there are a lot of things on my “to buy” list…so back in the muffin tin it is! For now, anyways!

Here We Go Steelers!

8 Feb

My dad was born right outside of Pittsburgh and so we have been life long Steelers fans. This has been a pretty amazing season for us ans so when we got invited to a Super Bowl party, I got excited very quick at a chance to make my second cake. This time with…FONDANT. Dun dun dun!

I didn’t want to buy fondant because that would defeat the whole purpose of me teaching myself how to decorate. So, I used my handy-dandy search engine, google.com to see if I could find some simple fondant recipes. I happened to find a wonderful one made of marshmallows. The recipe claimed it was tastier than regular fondant (I’ll agree to that one!), so I kept it.


  • 16 oz of mini-marshmallows (I used large ones, which only come in 10 oz bags, so I just guessed)
  • 2 to 5 tablespoons of water (again, I never measured, just guessed)
  • 2 lbs confectioners sugar
  • Crisco shortening (lots & lots & lots of it)

When I did this I followed the instructions to a tee, but later found some easier tips. I had to make two batches because I made such a long cake. First, the recipe I found recommended that the fondant be refrigerated (they said for almost a week), but it was not necessary. So I got up early (9am is early for a college kid on a Saturday) and made my fondant and put it in the fridge.

First, put the marshmallows in a microwave safe bowl (or double boiler) and add a tiny bit of water and nuke those babies until they are just barely melted. This is the sticky part. At first I put tons and tons of Crisco on the counter and put the marshmallow straight on it and started putting the sugar in a little at a time with my hands. It was an impossible clean up, which I regret. I got smarter on the second batch and left it in the bowl, put a generous amount of shortening on a wooden spoon, and added my sugar straight into the bowl with the spoon. Once it wasn’t quite so messy, I put it on the counter. Much easier clean up that time. Unfortunately, the next part wasn’t learned until a few hours ago. I added my food coloring to the fondant as I was kneading it together. It was already in fondant form when I added the coloring. I read on a different site a few hours ago that you should add the food coloring in with the marshmallows as you’re melting them. I will most definitely be trying that next time, because adding coloring to fondant is hard. And my hands are still yellow.

So, after this was done I put my fondant in Saran wrap and then in ziplock bags and then in the fridge. Then I went back to bed because I’m lazy. I woke  up a bit later to start my cake. I had been told there would probably be about 20 people at this party so I knew I needed a cake big enough for everyone, but also something not too large and overwhelming. This is only my second cake decorating attempt, after all. So I bought a large 15 x 11 baking pan so that my cake would be long and flat. I found a recipe I really liked online and used it. My first attempt was a failure.


I got anxious and didn’t let it cool enough. Also, this is why you don’t bake cakes the same day as the event.

So, I baked cake number two.

  • 1 3/4 cups all-purpose flour
  • 2 cups sugar
  • 3/4 cups cocoa powder
  • 2 teaspoons baking soda
  • 1 teaspoon baking powder
  • 1 teaspoon salt
  • 1 cup buttermilk, shaken
  • 1/2 cup vegetable oil
  • 2 extra-large eggs, at room temperature
  • 1 teaspoon pure vanilla extract
  • 1 cup freshly brewed hot coffee

This was my first cake from scratch. Also, the first time I’d seen a cake mix with coffee. Mix all the dry ingredients together (my mom has a nice KitchenAid mixer that I fell in love with when making this cake). Mix all the wet ingredients in a separate bowl, minus the coffee. Once the wet ingredients are blended, slowly add them to the dry ingredients with the mixer on low. After you have everything added together, slowly add the coffee. After I added the coffee, I was worried that  the batter was too runny so I ended up adding about another half a cup of flour. Just use your judgment, I guess.

I made some buttercream icing to use as my “glue” for the fondant to stick to the cake. Just a crumb coating was good.

Then came the hardest part. Well, I thought it was the hardest part at the time. I had to add the fondant to the cake. I got it all the right size and shape (I just used the cake pan as a guide and made it a little longer on each side). But getting it onto the cake…geezy cow! I finally managed but I had one little tear in the top left corner. In my mind I had been picturing a cake with a GB logo on the left and Steelers on the right. I also imagined the logos being in all fondant, but that didn’t happen either. I had to reverse the logos because the Steelers logo is round and the GB logo is oval, so the Steelers logo covered the tear better. I was going to make the logos out of fondant, but at that point I was frustrated with fondant so I just decided to use some royal icing to make the logos. (Royal icing = confectioners sugar, 5 tbsp powdered egg whites, & 1/2 cup water). I printed out the logos and used toothpicks to outline the logos onto the cake. Everything looked really decent until it came time to actually write the word “Steelers.” My tip was too big and royal icing starts out kind of runny, so the letters bled together. I had planned on writing Super Bowl XLV on it, too, but after my bad attempt with Steelers I opted out of anymore lettering.


The final product. The “G” is good…so are the hypocycloids (the four point starts of the Steelers logo).
Lettering will be on my list of things to improve!


Also, I shed a small tear for my team’s loss….but the Packers played great.

The 1st Cake!

8 Feb

This first cake I did not make from scratch. Actually, I had never made a cake from scratch before this week. My Mamaw always makes cakes from scratch, but I’ve always used boxed cake mix. This cake was made on a low budget (I am a college student, after all!), because the night before at my waitressing job, I misplaced all my money. So, I bought a Devil’s Food Cake cake mix and all the necessary ingredients.

I used two 8×3 pans for my cake because I liked the taller size. I made my Devils Food Cake mix according to the box and put half in each pan. Pretty basic stuff, I knew I couldn’t mess this up. I put them on two separate plates to cool so that the process would speed up. I was excited to decorate my first cake!

My first attempt at icing, I was going to make Cool Whip icing because I had a friend tell me it was her favorite. I’d never even heard of it, so I figured, “what the heck?” Well, it’s not a thick icing so that got nixed pretty quick. On to the buttercream icing. I stole this recipe from Amanda at iambaker


1 cup (2 sticks) of unsalted butter
6 to 8 cups of confectioners sugar
1/2 cup of milk
2 teaspoons of clear vanilla extract

Melt the butter in a microwave safe bowl and then add milk and clear vanilla extract. The clear part is kind of important if you want white icing. Otherwise, I’m not sure if it matters. I’ve only used clear vanilla. Then, I used a hand-held mixer on the lowest setting and added in the sugar and food coloring of my choice. I don’t know what I did, but at first the icing looked like it was separating. You could see the color  I had put in and the white from the icing separately. It fixed itself after I added more sugar, but I apparently didn’t add enough  because the icing was not as thick as I would have liked it to be.

Now, after my cake was cool I did a crumb coating with my icing to hold it together and then I put the rest in my official Duff (you know, the guy from Ace of Cakes? LOVE HIM) decorating pastry bags with tips. As I said, I don’t think I got the icing quite thick enough because it came out okay, but not a clean looking as I would have liked.


I took the cake into work with me that night and everyone loved it. I even was told it was the best cake someone had ever had…which made me laugh because it was a box cake. But it was a self-esteem booster. Next time I’ll add more sugar to my icing and it’ll look better. Hopefully.

So, that was my first attempt at what I have been calling “professionally decorating” a cake. Oy.

The first post

8 Feb

Ah, the first post of a new blog. I suppose I shall tell you all a bit about myself before I begin the actual blogging process. My name is Mallory. I am a college student in the middle of applying to graduate school. I have always been a baker (I can’t cook a meal if my life depended on it), and I love making cookies and cakes. Baking is the easy part, though. We only have a handful of channels at our house on the farm, and so a few weeks ago I was stuck watching Cake Boss and I was enthralled. I will learn to do that. And so begins our journey. I can bake, but can I decorate? No, probably not. But I am going to try anyways. And these subsequent posts will be my attempts.